Key Takeaways
- Definition: Soil testing measures the physical and engineering properties of soil so engineers can classify materials and derive design-ready parameters.
- Use case: It supports foundation design, earthwork control, pavement support evaluation, seepage assessment, slope stability, and settlement prediction.
- Main decision: The most important choice is not just which test to run, but which test result actually represents field conditions and the controlling design problem.
- Outcome: After reading, you should be able to connect common soil tests to real project decisions and spot results that need a second look.
Table of Contents
Introduction
In brief: Soil testing is the process of measuring classification, strength, compressibility, compaction, and hydraulic properties so engineers can make defensible geotechnical decisions.
Who it’s for: Students, EITs, and practicing engineers.
Good soil testing is not a checklist exercise. It is a targeted program that turns subsurface uncertainty into usable design inputs, construction controls, and realistic engineering judgment.
Soil Testing infographic
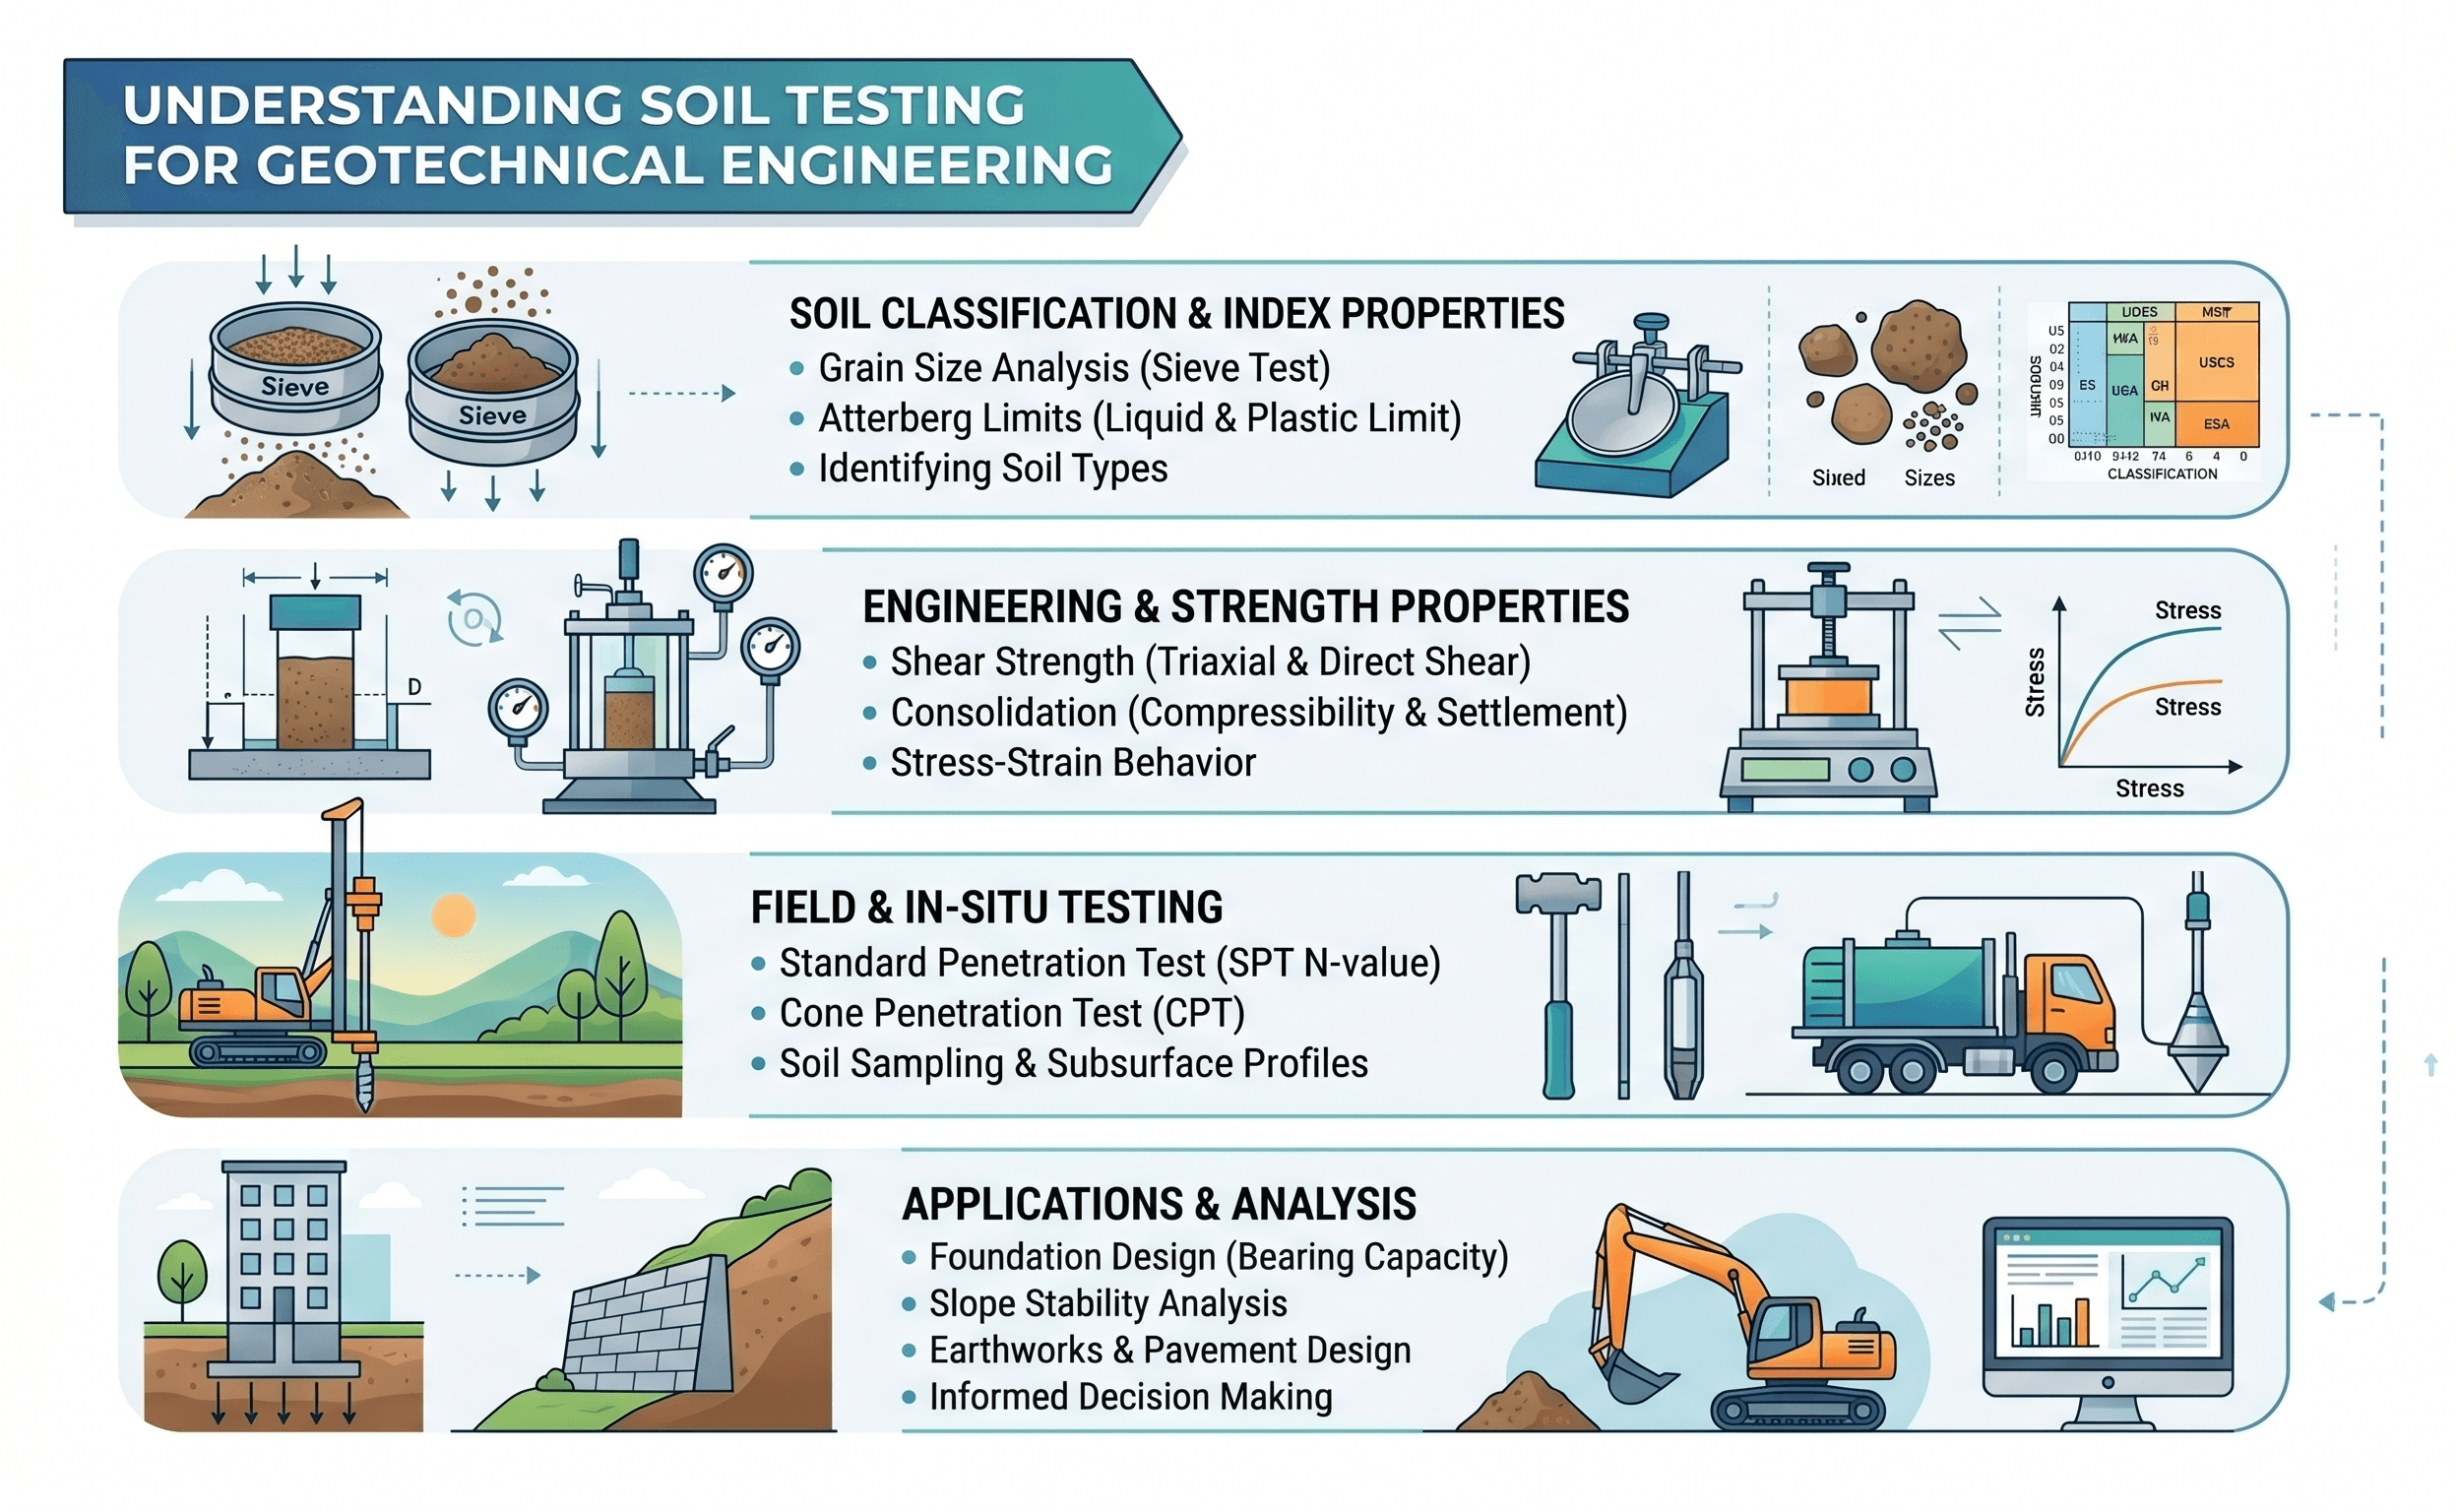
Notice the flow from identification to behavior. Engineers usually start by classifying the soil, then move into the performance question that actually controls the project: strength, compaction, water flow, or settlement.
What is soil testing?
Soil testing is the structured measurement of soil properties through laboratory and field procedures. The goal is not merely to collect numbers. The goal is to understand how the ground will behave when loaded, excavated, wetted, drained, compacted, or left in service over time.
In practice, soil testing usually starts with geotechnical investigation and sample collection. From there, an engineer builds a testing plan around the project risk. A shallow footing on granular soil needs different data than a highway embankment on soft clay, and both need different data than a seepage-sensitive retaining structure.
The output of soil testing can be grouped into four broad functions: identification, strength, compressibility, and hydraulic behavior. Identification tests tell you what the soil is. Strength tests tell you how much resistance it can mobilize. Compressibility tests help predict settlement. Hydraulic tests explain how water moves through the material and how pore pressure may change the design problem.
That is why soil testing sits at the center of geotechnical engineering. It feeds foundation design, earthwork specifications, pavement subgrade evaluation, slope stability, retaining wall design, settlement analysis, and groundwater-related risk.
Core principles, variables, and units
A soil test result only becomes useful when the engineer knows what was measured, on what specimen, under what stress and drainage conditions, and in what units. The same soil can give very different answers depending on disturbance, moisture condition, compaction state, and how the test was run.
Key variables and typical ranges
The most common soil-testing variables are basic but powerful. Water content helps explain workability and compaction response. Grain-size distribution controls classification and drainage tendencies. Atterberg limits reveal plasticity and likely moisture sensitivity. Dry density and optimum moisture content drive earthwork control. Shear strength parameters control bearing and slope performance. Coefficient of permeability affects seepage and drainage behavior. Compression index and preconsolidation stress matter when long-term settlement is a concern.
- w Water content, usually reported as a percent of dry mass; essential for classification, compaction, and consistency checks.
- γd Dry unit weight or dry density; used heavily in compaction control and subgrade acceptance.
- LL / PL / PI Liquid limit, plastic limit, and plasticity index; used to judge plasticity, shrink-swell tendency, and fines behavior.
- c, φ Strength parameters from shear testing; they control many bearing, slope, and lateral earth pressure calculations.
- k Coefficient of permeability; often varies by orders of magnitude, so sanity checks matter.
- Cc, σ′p Compression index and preconsolidation stress; central to settlement interpretation in clays.
Even simple equations like water content become meaningful only when sampling and drying are done correctly. A wrong moisture value can distort classification, compaction interpretation, and whether a specimen seems representative of field conditions.
Do not treat laboratory values as universal soil constants. Most are condition-dependent and should be interpreted in the context of stress level, drainage path, and expected field construction sequence.
Decision logic for building a soil testing program
A strong soil testing program starts with the failure or performance mode you care about most. That is the fastest way to avoid paying for tests that produce technically correct data but little design value.
Start with the project question. If the concern is classification and material suitability, prioritize moisture content, sieve analysis, and Atterberg limits. If the concern is earthwork control, add Standard Proctor testing or modified compaction methods. If the concern is foundation or slope strength, move into direct shear, unconfined compression, or triaxial testing. If the concern is seepage and drainage, add permeability testing. If the concern is long-term settlement, prioritize consolidation testing and stress-history interpretation.
The sequence matters. Many projects fail because an engineer jumps directly to strength or settlement without first verifying that the soil has been classified correctly and that the sample quality is good enough to support advanced testing.
Equations and calculations engineers actually use
Soil testing is full of measured values, but engineers often need to convert those values into normalized design quantities. One of the best examples is laboratory compaction, where dry unit weight is derived from moist unit weight and water content.
Here, \( \gamma_d \) is dry unit weight, \( \gamma \) is moist unit weight, and \( w \) is water content expressed as a decimal. This relationship appears constantly in earthwork interpretation because compaction acceptance is usually tied to dry density rather than bulk density.
Strength and settlement work depend on more advanced equations, but the key lesson is the same: the math is only as good as the specimen and the test condition behind the parameter. A friction angle from a drained direct shear test is not interchangeable with an undrained strength from a triaxial test. A coefficient of permeability derived on reconstituted sand may not represent a fissured clay seam or a compacted fill with field variability.
When a value feels surprising, check three things before trusting it: sample disturbance, specimen moisture condition, and whether the chosen test matches the controlling field stress path.
Worked example: selecting tests for a building pad and shallow footing project
Example
Assume a low-rise building is planned on a site with fill over medium-stiff clay. The owner wants recommendations for footing support and building pad preparation. A useful testing program might begin with moisture content, gradation, and Atterberg limits on the fill and native clay so the engineer can classify materials and judge reuse potential. Next, Standard Proctor testing is added because pad construction quality will likely be specified as a percentage of maximum dry density near optimum moisture.
Because the native clay will support shallow foundations, the engineer also requests strength testing. If short-term loading or construction staging suggests undrained behavior, triaxial or unconfined compression testing may be more relevant than a drained direct shear test. If settlement risk is meaningful, consolidation testing is added to estimate magnitude and time rate of settlement.
The insight is that no single test answers the whole project. Classification tells you what the material appears to be. Compaction tells you how to place it. Strength tells you what it can support. Consolidation tells you how it will move over time. Good geotechnical judgment is the process of fitting each test result into the correct design question.
Engineering judgment and field reality
Soil testing often looks cleaner in the laboratory than it does in the field. Samples dry out during handling. Soft clays get disturbed during recovery. Gravelly soils may be underrepresented in split-spoon samples. Seasonal groundwater changes can make a clean lab result feel disconnected from what the contractor actually sees in the excavation.
Experienced engineers therefore look for patterns, not isolated numbers. They compare boring logs, field observations, groundwater notes, and laboratory results. They ask whether the test specimen actually represents the zone controlling the design. They also ask whether the project is governed by short-term construction behavior or long-term in-service performance.
This is where pages like Soil Mechanics, Geotechnical Data Analysis, and Geotechnical Reporting become part of the same workflow. Testing alone does not create a defensible design. Interpretation does.
A perfectly run test on a poor specimen is still poor design input. Sample quality and representativeness are often more important than the sophistication of the laboratory procedure.
When this breaks down
Soil testing breaks down when the engineer assumes that one measured number fully describes a naturally variable material. Soils are layered, anisotropic, stress-history dependent, and often moisture sensitive. A single PI, friction angle, or permeability value may be useful for screening, but it can be dangerous when used without a range check or geological context.
The method also breaks down when the wrong test is selected for the governing mechanism. For example, using a simple classification result to infer settlement behavior in soft clay is not enough. Using a direct shear result to represent an undrained construction problem may also be misleading. Likewise, earthwork compaction targets derived from the wrong borrow source can create field conflict even if the testing itself was technically correct.
Another weak point is overconfidence in laboratory perfection. Fissured clays, collapsible soils, expansive soils, organic materials, and heavily weathered soils can behave in ways that are only partly captured by standard tests. That is when additional sampling, supplemental testing, or conservative design judgment becomes necessary.
Common pitfalls and engineering checks
- Using disturbed samples for tests that require intact structure or representative fabric.
- Assuming a single parameter applies uniformly across an entire site.
- Mixing SI and US customary units during interpretation or specification writing.
- Using classification data as a substitute for strength, compressibility, or hydraulic testing.
- Ignoring groundwater timing, sample handling, and seasonal moisture variation.
One of the costliest mistakes is specifying tests before defining the design problem. That usually produces data that looks complete in a report but does not answer the question controlling performance or risk.
| Parameter | Symbol | Typical units | Notes |
|---|---|---|---|
| Water content | w | % | Basic index value used throughout classification and compaction work. |
| Dry unit weight | γd | pcf or kN/m³ | Used for compaction targets and density comparison. |
| Plasticity index | PI | dimensionless | Helpful for fines characterization and shrink-swell screening. |
| Friction angle | φ | degrees | Depends strongly on drainage condition and test setup. |
| Permeability | k | cm/s or m/s | May vary by orders of magnitude; always confirm plausibility. |
Visualizing how soil tests connect to design
A useful mental model is to picture soil testing as a decision map rather than a list of lab procedures. Index tests tell you what kind of soil you have. Compaction tests tell you how to place it. Strength tests tell you how it will resist loading or movement. Hydraulic and consolidation tests explain how water and time will change the problem.
That framework helps explain why two projects with similar classifications may still need very different test programs. The same lean clay can be acceptable as compacted fill, risky for shallow footings, manageable with drainage control, or problematic under sustained load depending on what controls the design.
In other words, the best visualization is often a simple engineering question: what failure mode or serviceability limit am I trying to predict?
Relevant standards and design references
Soil testing is standardized for a reason. Consistent procedures improve comparability, defensibility, and repeatability across laboratories and projects.
- ASTM D2487 / ASTM D2488: Classification of soils using the Unified Soil Classification System and visual-manual identification. These are foundational when the first question is “what material am I dealing with?”
- ASTM D4318: Liquid limit, plastic limit, and plasticity index. Critical for fine-grained soil classification, shrink-swell screening, and earthwork interpretation.
- ASTM D698 / ASTM D1557: Standard and modified laboratory compaction characteristics. Used to establish moisture-density relationships and field compaction targets.
- ASTM D2434 / ASTM D5084: Permeability testing methods for different soil conditions and apparatus types. These become important when drainage, seepage, or dewatering performance matters.
- ASTM D3080 / ASTM D4767 / ASTM D2435: Direct shear, triaxial shear, and consolidation testing. These govern many strength and settlement evaluations when design moves beyond basic classification.
Transportation projects often layer ASTM methods with AASHTO procedures and agency-specific geotechnical manuals, especially when subgrade, embankment, and pavement support are part of the scope.
Frequently asked questions
Soil testing is the measurement part of the workflow, while geotechnical investigation is the broader process of planning exploration, collecting samples, choosing tests, and converting the results into design parameters and recommendations.
The most common tests include moisture content, sieve analysis, Atterberg limits, compaction testing, permeability testing, direct shear, triaxial testing, and consolidation testing, with the final mix driven by the project’s controlling design question.
They become misleading when samples are disturbed, groundwater conditions are misread, natural variability is ignored, or a laboratory result is applied directly without checking whether the specimen and test condition represent the field problem being designed.
Different tests examine different behaviors under different preparation and loading conditions, so apparent contradictions usually mean the engineer still needs to connect each result back to the specific field condition, drainage assumption, and design limit state.
Summary and next steps
Soil testing is most useful when it is treated as a decision-support system rather than a lab menu. The best programs start with the project question, choose tests that reflect the governing behavior, and interpret the results in the context of sampling quality, groundwater, variability, and construction reality.
For most projects, what controls the work is not the longest list of tests. It is the clearest link between site conditions and the parameter that matters most: classification, compaction, strength, permeability, or settlement. That is where sound engineering judgment turns raw data into defensible recommendations.
As you go deeper, focus on the workflow. Learn how the investigation, the laboratory program, the parameter selection, and the written geotechnical recommendations fit together. That is how soil testing becomes valuable in practice.
Where to go next
Continue your learning path with these curated next steps.
-
Build your base in Soil Mechanics
Useful when you want the theory behind water content, effective stress, density, and soil behavior.
-
Study Geotechnical Investigation
The next step if you want to connect testing plans to borings, sample quality, and subsurface exploration strategy.
-
Go deeper with Geotechnical Data Analysis
Best when you want to turn raw test data into representative design values and review-ready conclusions.