
Direct Answer
Mechanical design principles are the practical rules engineers use to make a component or machine perform its required function under real loads, manufacturing variation, environmental conditions, and service demands.
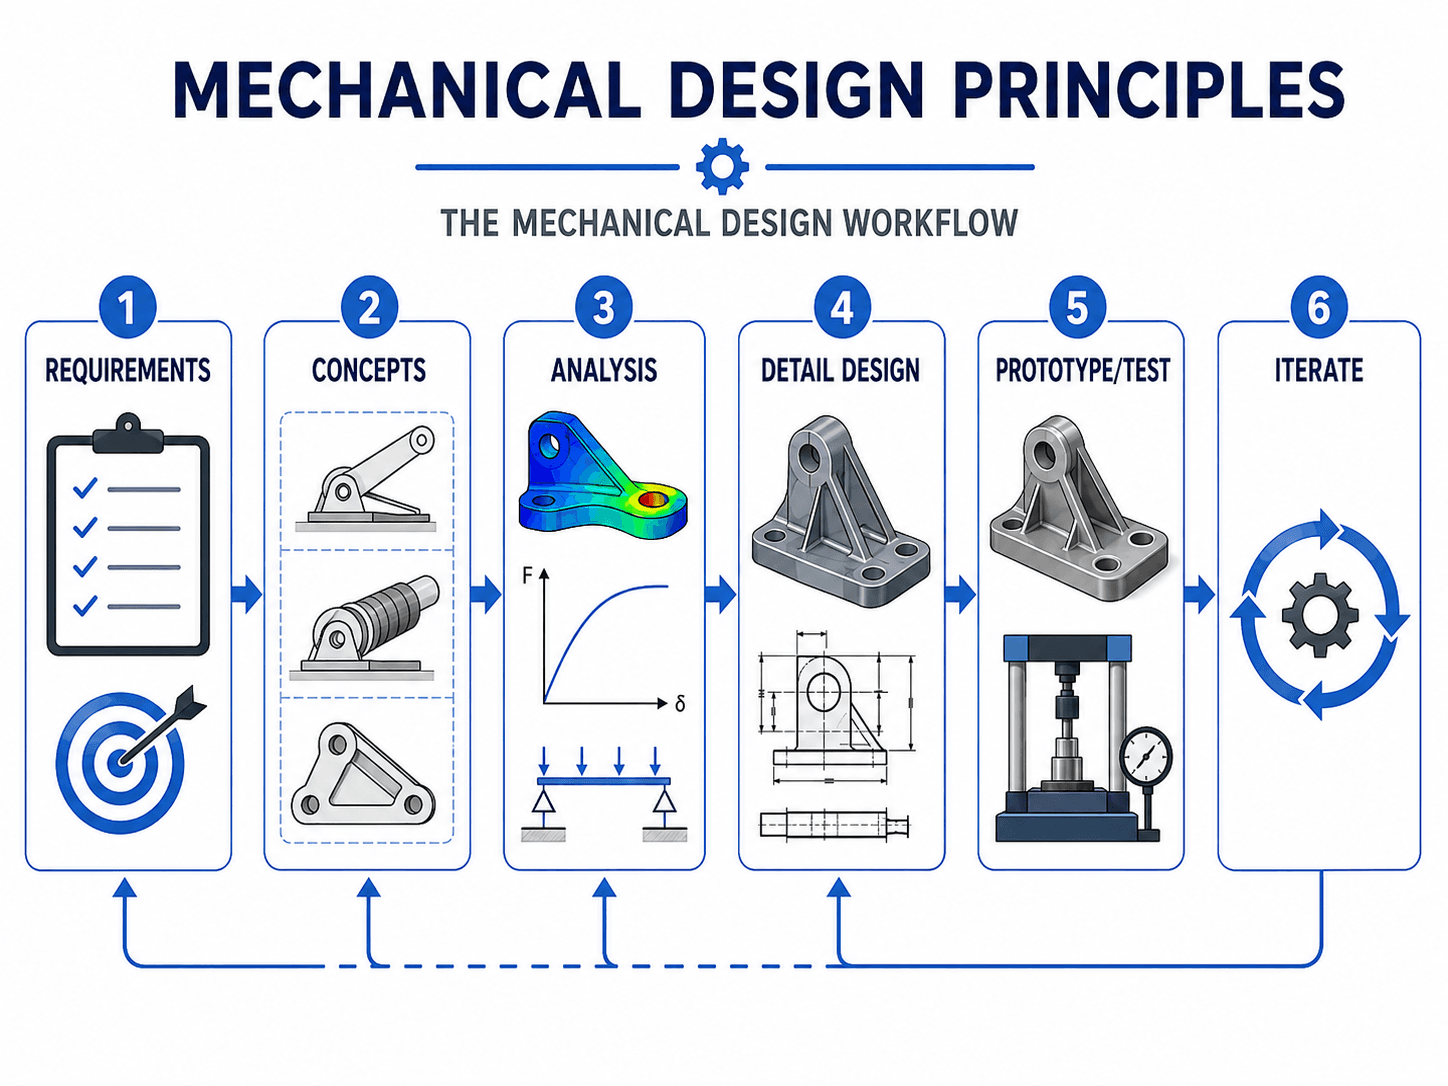
A sound design starts with measurable requirements, creates a clear load path, checks strength and stiffness, accounts for fatigue and wear, selects materials and manufacturing methods together, controls only the tolerances that affect function, and verifies the finished design with calculations, inspection, testing, or field evidence. These principles sit inside the broader mechanical design discipline and are applied through the mechanical design process.
10 Core Mechanical Design Principles
These principles are most useful as a decision framework rather than a memorized list. Each one answers a question that should be resolved before a design is released.
Function, requirements, load cases, interfaces, environment, life, and constraints.
Load path, stiffness, material behavior, manufacturing capability, tolerances, and assembly.
Calculations, simulation where appropriate, inspection, prototype testing, and field feedback.
- Define the function before the geometry. State what the part or assembly must do in measurable terms before deciding what it looks like.
- Identify realistic load cases and constraints. Include static, cyclic, impact, torque, pressure, thermal, vibration, and misuse conditions where they are credible.
- Create a short, predictable load path. Transfer forces and moments through geometry that avoids unnecessary eccentricity, weak sections, and abrupt stress raisers.
- Check strength and stiffness separately. A part can be below yield stress and still fail functionally because it deflects, twists, buckles, or loses alignment.
- Design for fatigue, wear, and life. Repeated loads, contact, vibration, lubrication, surface condition, and maintenance can control long before static strength does.
- Select material for the whole operating environment. Strength matters, but so do modulus, toughness, corrosion, temperature, density, wear, availability, and process compatibility.
- Design geometry for the manufacturing process. Feature size, wall thickness, radii, access, finish, and tolerance capability should fit how the part will actually be made.
- Control tolerances by function. Tighten dimensions that control fit, sealing, alignment, preload, clearance, or motion; avoid expensive precision where it adds no value.
- Design for assembly, inspection, and service. Real tools, real hands, replacement parts, datums, gauges, and maintenance access belong in the design problem.
- Verify requirements and validate intended use. Use analysis, inspection, demonstration, and testing as appropriate to confirm specified requirements, then confirm the realized product works for its intended users and environment.
Key Takeaways
- Function comes first: CAD geometry should be the result of requirements and engineering decisions, not the starting point.
- The controlling limit may not be strength: stiffness, fatigue, wear, thermal growth, vibration, tolerances, or service access often govern the final design.
- Precision should be intentional: tolerances are a functional and economic design choice, not a sign of quality by themselves.
Start With Requirements, Constraints, and a Clear Load Path
A mechanical design should begin with what must be achieved and what can prevent success, then convert those requirements into a geometry with clear interfaces, constraints, and load paths.
Define measurable requirements before CAD
“Strong,” “light,” and “easy to manufacture” are goals, not useful design requirements. A better requirement defines a measurable outcome: maximum load, allowable deflection, required travel, speed, operating temperature, target life, interface dimensions, maintenance interval, or acceptance test. This makes later design decisions traceable instead of subjective.
Treat loads and constraints as a system
Loads are only meaningful when the supporting constraints are understood. A bracket with two slotted fasteners behaves differently from the same bracket rigidly fixed at four points. A bearing support that is overconstrained can generate assembly stress or thermal preload even when the external load is modest. Identify where forces enter, where reactions occur, which degrees of freedom must be constrained, and which directions need freedom for alignment or thermal growth.
Make the load path easy to trace
A useful review question is: “Can I trace the force from the point of application to the support without jumping through a weak or ambiguous feature?” Direct load paths usually reduce bending, fastener prying, local deformation, and difficult-to-predict stress concentrations. Ribs, section depth, fastener spacing, bearing surfaces, and transition radii should support that path rather than merely fill space.
NASA’s systems engineering guidance describes design as an iterative process that develops a solution capable of analytical verification against requirements: NASA Systems Engineering Handbook — System Design Processes.
Strength, Stiffness, Fatigue, and Failure Margin
A static stress check is only one part of mechanical design. Engineers also evaluate deformation, buckling, fatigue, wear, contact stress, vibration, thermal distortion, and joint behavior according to the application. The related stress analysis guide goes deeper into load cases, boundary conditions, stress, deflection, and design margin.
Strength
Ask whether stress or contact pressure exceeds an allowable limit for the material and failure mode under the governing load case.
Stiffness
Ask whether deflection or rotation prevents alignment, sealing, positioning, bearing performance, gear contact, or user function before material failure occurs.
Fatigue and life
Ask whether repeated stress, vibration, surface condition, notches, weld details, temperature, or corrosion can initiate damage over the required service life.
- n Ratio of allowable strength to the calculated applied stress for the specific check being made.
- Sallow Allowable strength or design limit. Its basis must match the material, failure mode, temperature, loading type, and governing criteria.
- σapplied Calculated stress for the selected load case, including relevant stress concentration, load distribution, or analysis assumptions.
Engineering meaning: A factor or margin is only meaningful when the numerator and denominator represent the same failure mode and credible conditions. A high static margin does not automatically prove adequate fatigue life, stiffness, buckling resistance, wear life, or joint reliability.
MIT’s Elements of Mechanical Design materials treat fatigue, constraint-based design, bearings, bolted joints, shafts, gears, and vibration as distinct design topics rather than a single static-strength problem: MIT OpenCourseWare — Elements of Mechanical Design Lecture Notes.
Design Material, Geometry, and Manufacturing Together
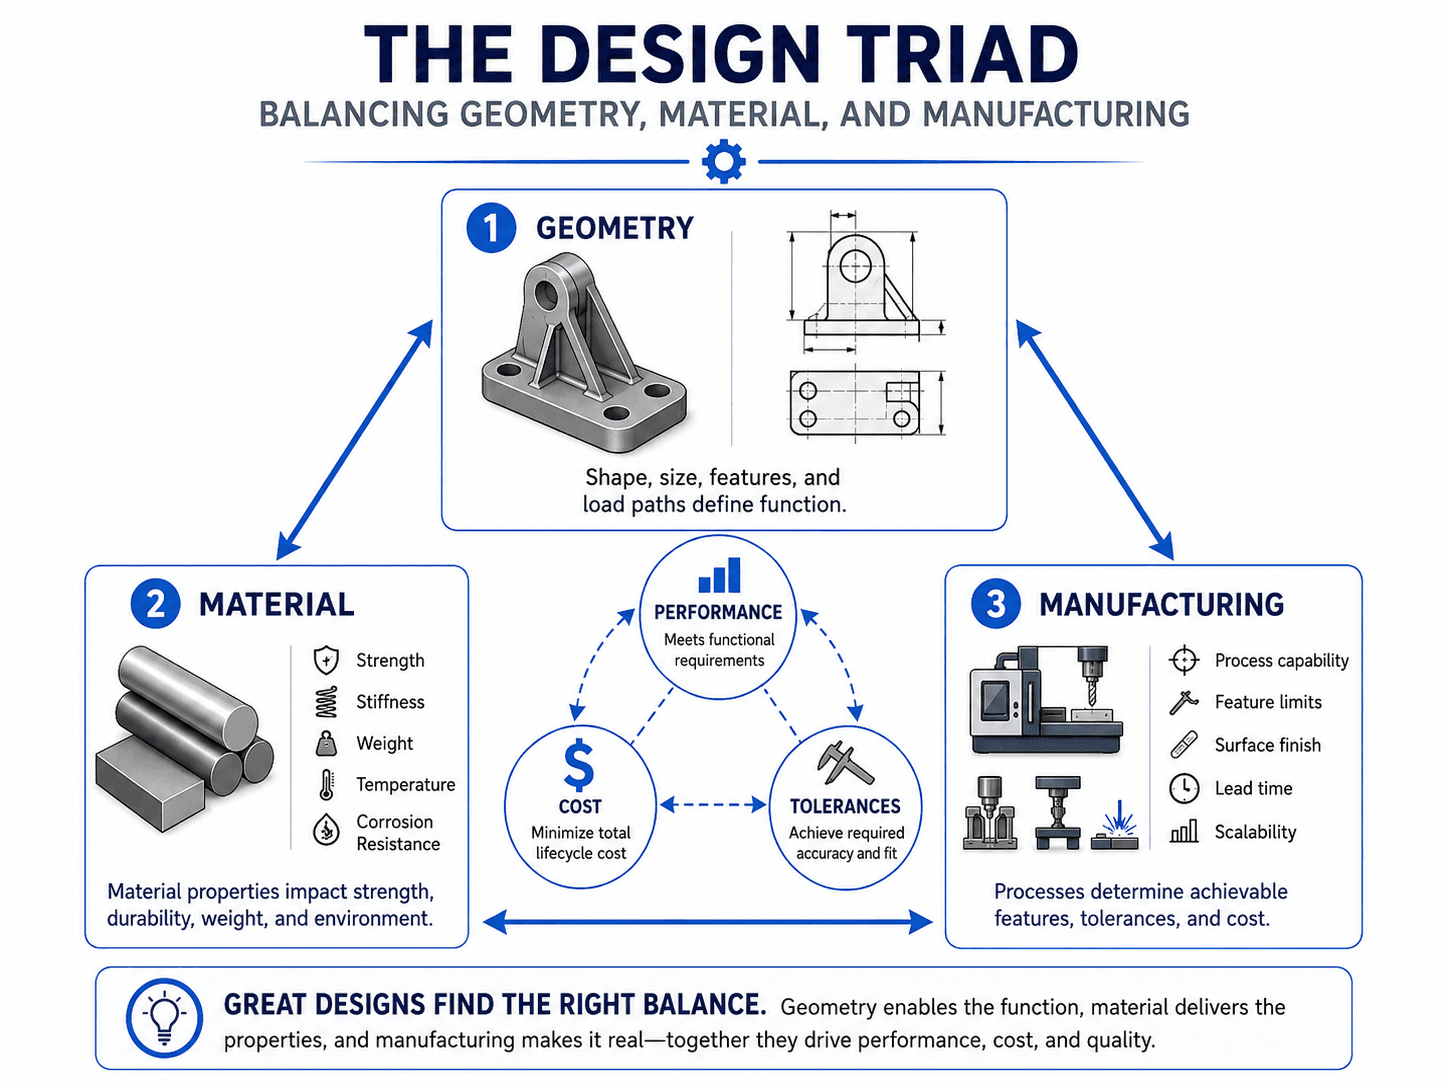
Material, geometry, and manufacturing process are coupled decisions: changing any one of them changes what performance, tolerance, cost, and reliability are realistically achievable. For deeper treatment, see material selection and design for manufacturing.
Select material by the failure mode and environment
Yield strength may be important for a loaded bracket, modulus may control a precision support, toughness may matter under impact, hardness may control wear, and corrosion resistance may dominate an outdoor linkage. Temperature, joining method, surface treatment, availability, machinability, density, and supply-chain risk can change the best choice even when several materials pass a simple strength calculation.
Match geometry to the intended process
Machining, casting, forging, sheet-metal fabrication, welding, molding, and additive manufacturing reward different geometry. Deep pockets, thin walls, inaccessible internal corners, excessive machining setups, unsupported printed features, awkward weld access, or precision applied to every surface can increase cost and variability without improving function.
Design for inspection as well as production
A functional requirement is weak if the production team cannot verify it consistently. Critical datums, fits, hole patterns, flatness, position, surface finish, or runout should be defined in a way that manufacturing and quality teams can measure using a practical inspection method.
Tolerances, Fits, Datums, and Assembly Reality
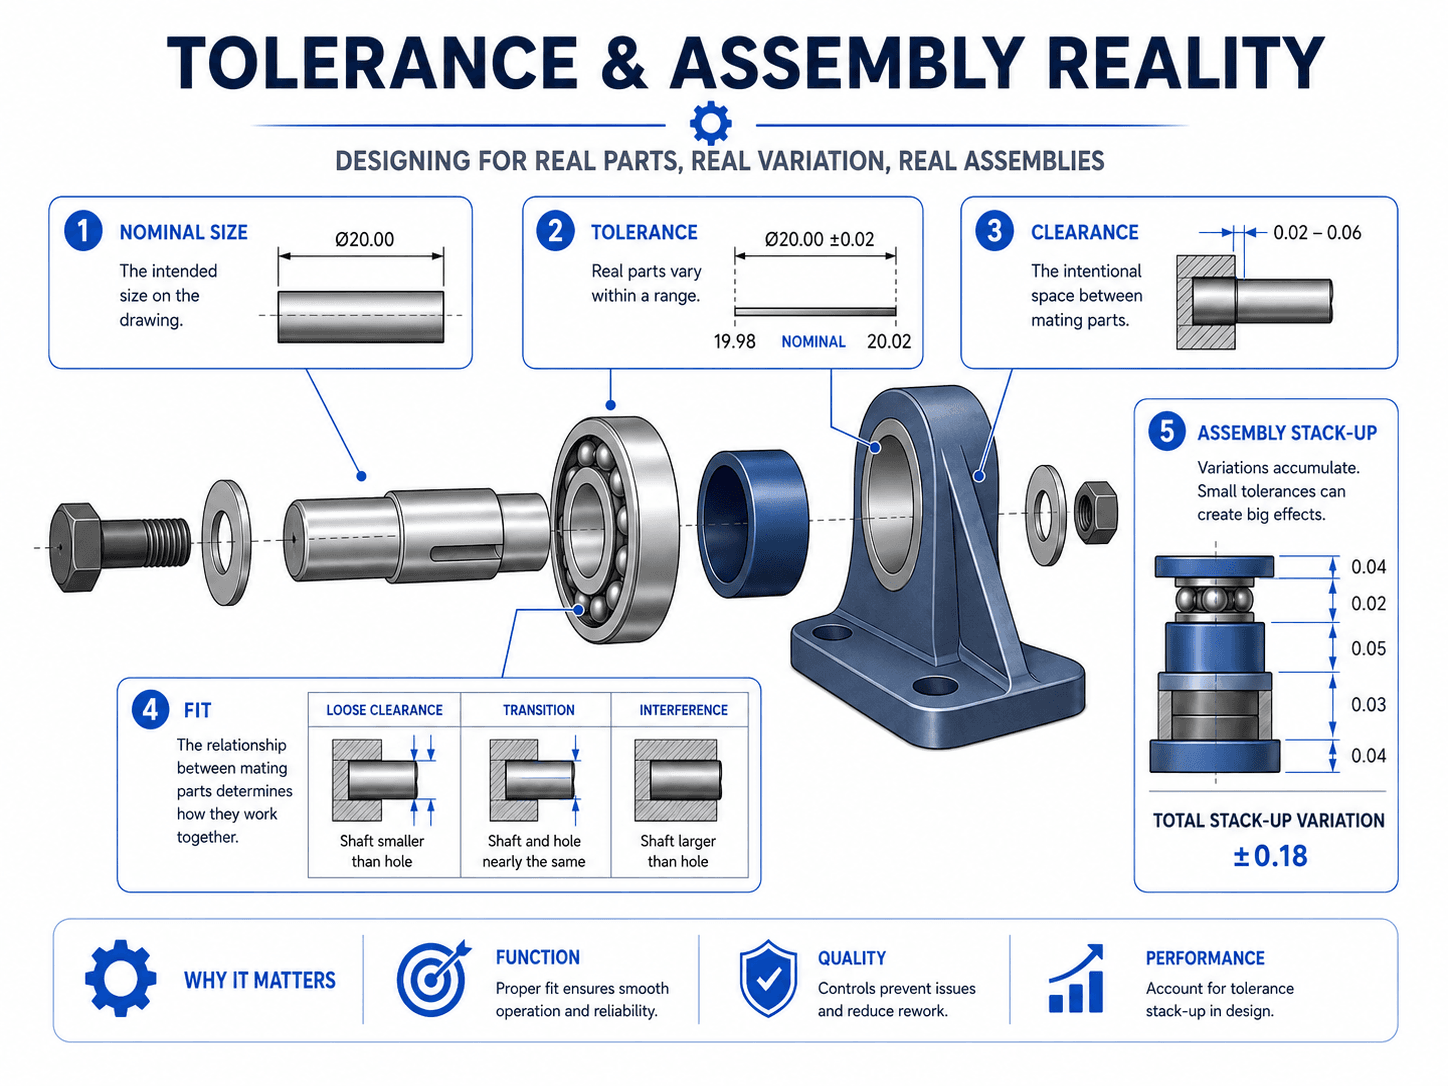
Mechanical parts are never manufactured exactly at nominal size, so the design must function across the allowed variation of every dimension and interface that matters.
Tighten only the dimensions that control function
A tighter tolerance generally demands more capable processing, more inspection, or more scrap risk. Use precision where variation affects fit, alignment, sealing, motion, bearing performance, preload, balance, or another measurable requirement. Leave noncritical dimensions economical.
Choose fits from the intended behavior
Clearance fits support free assembly or motion, interference fits intentionally create press or shrink engagement, and transition fits occupy the boundary between the two. The correct fit depends on load transfer, service temperature, assembly method, removal needs, surface condition, and the standard or supplier recommendation governing the component.
Analyze the chain, not just individual dimensions
A tolerance that appears harmless by itself can become critical when several parts stack in the same direction. Worst-case or statistical stack-up methods are used according to the risk, production method, and acceptance strategy. Critical chains should be traceable to a functional requirement such as minimum clearance, bearing location, gear mesh, seal compression, or fastener engagement. The dedicated tolerance stack-up analysis guide shows how to build and check those chains, while the GD&T guide covers geometric controls and datum relationships.
ASME Y14.5 establishes symbols, rules, definitions, requirements, defaults, and recommended practices for geometric dimensioning and tolerancing: ASME Y14.5-2018 (R2024) — Dimensioning and Tolerancing.
Mechanical Design Tradeoffs and Decision Rules
Good design does not maximize every attribute. It finds the combination that satisfies the requirements with acceptable risk, manufacturability, serviceability, and lifecycle cost.
Strength vs. weight
Best fit: Improve section geometry and load path before simply adding material.
Tradeoff: Added mass can increase inertia, handling effort, shipping cost, or dynamic loads.
Do not optimize blindly: The lightest solution is not automatically the most fatigue-resistant, stiff, or economical.
Precision vs. cost
Best fit: Apply tight tolerances to dimensions with a clear functional reason.
Tradeoff: More precision can require slower processes, better machines, more inspection, and higher scrap risk.
Do not tighten by habit: A small tolerance is not proof of a better design.
Stiffness vs. compliance
Best fit: Use stiffness for alignment and positioning; use controlled compliance where shock, misalignment, or overconstraint must be absorbed.
Tradeoff: Maximum rigidity can increase load transfer or thermal stress in some systems.
Do not assume: Determine which degrees of freedom require constraint and which benefit from flexibility.
Custom vs. standard components
Best fit: Prefer standard bearings, fasteners, seals, springs, couplings, and stock sizes where they satisfy the requirement.
Tradeoff: Custom geometry can improve packaging or performance but adds sourcing, drawing, tooling, and replacement burden.
Do not customize unnecessarily: Make custom parts earn their complexity.
Application Example: Designing a Bearing Support Bracket
Consider a bracket that supports a bearing for a small rotating shaft. Drawing a base, bolt holes, and a circular bearing pocket creates geometry, but it does not yet prove the bracket is a good mechanical design.
- Define the requirements: Establish radial and axial bearing reactions, shaft speed, alignment tolerance, operating temperature, expected life, mounting interface, bearing fit, corrosion exposure, and service requirements.
- Create the load path: Locate the bearing pocket and mounting bolts so bearing reactions transfer through short, stiff sections. Add section depth or ribs where they meaningfully reduce bending rather than thickening the entire bracket.
- Check the controlling behaviors: Verify local stress, bracket deflection, fastener/joint loading, bearing-seat distortion, fatigue-sensitive transitions, and any thermal misalignment that could shorten bearing life.
- Design the production definition: Choose material and process, establish datums from the mounting interface, tolerance the bearing bore and alignment features intentionally, provide machining and inspection access, and loosen nonfunctional dimensions.
- Review assembly and service: Confirm wrench or socket access, bearing installation method, removal path, lubrication access where applicable, and how alignment will be checked after assembly.
- Verify before release: Use calculations and inspection requirements, then prototype or test the assembly when uncertainty or failure consequence justifies it.
The improved bracket is not necessarily the most complex one. It is the version where the load path is obvious, stiffness is adequate, critical features are measurable, tolerances match function, and the bearing can be assembled and serviced without workarounds.
Mechanical Design Review Checklist
Use this checklist before drawing release, prototype approval, or a formal design review. The goal is to expose assumptions and missing verification, not merely confirm that the CAD model is complete.
- Requirements: Are function, loads, duty cycle, life, environment, interfaces, and acceptance criteria measurable?
- Load path: Can forces, torque, pressure, and reactions be traced through the geometry and joints?
- Constraints: Are the necessary degrees of freedom constrained without creating avoidable binding or thermal stress?
- Strength and stiffness: Have both failure and functional deformation limits been checked?
- Fatigue and wear: Have cyclic loads, vibration, stress concentrations, surface condition, lubrication, and wear interfaces been considered?
- Material: Does the choice fit mechanical properties, environment, temperature, corrosion, availability, and process needs?
- Manufacturing: Can the intended process make the geometry, finish, and tolerances consistently and economically?
- Tolerances and datums: Are critical dimensions tied to function, assembly, and a practical inspection method?
- Assembly: Can parts be inserted, aligned, fastened, torqued, adjusted, and verified with available tools?
- Maintenance: Can wear parts, bearings, seals, lubricated interfaces, fasteners, and inspection points be reached?
- Verification: Is each important specified requirement supported by objective evidence from analysis, inspection, demonstration, test, or other approved method?
- Validation: Has the realized design been shown to perform its intended function for the expected user, interfaces, and operating environment?
Verification asks whether the design meets its specified requirements. Validation asks whether the resulting product is the right solution for its intended use and environment. A design can satisfy its written requirements yet still expose a missed user, interface, maintenance, or operating need during validation.
Common Mechanical Design Mistakes and Failure Modes
Many mechanical failures begin with an assumption that was never made visible: an omitted load case, a nominal-only fit, an overconstrained interface, an inaccessible fastener, or a tolerance the shop cannot repeatedly hold.
- Starting with CAD instead of requirements: The geometry becomes difficult to challenge because the design intent was never written down first.
- Checking yield but ignoring deflection: A bracket, shaft, frame, or bearing support may survive the load yet misalign the system enough to fail functionally.
- Ignoring cyclic loading: Holes, keyways, threads, weld toes, sharp transitions, and rough surfaces can become fatigue initiation points.
- Designing only at nominal dimensions: Real assemblies must work at allowable tolerance extremes, not just at perfect CAD dimensions.
- Overconstraining the assembly: Multiple rigid locators can create binding, distortion, preload, or thermal stress when parts vary or expand.
- Using tight tolerances everywhere: This raises cost and inspection burden while hiding which dimensions actually control function.
- Forgetting manufacturing access: Tools still need to cut the feature, molds need draft and flow paths, welders need access, and inspectors need a way to measure it.
- Forgetting maintenance access: A reliable component becomes a poor product if a technician must remove half the machine to replace it.
- Treating simulation as proof by itself: FEA and other models are only as valid as their loads, constraints, material models, contacts, mesh, and assumptions.
A finished model is not the same as a finished design. Release should occur only after the controlling requirements, interfaces, failure modes, tolerances, manufacturing constraints, assembly needs, and verification evidence are understood.
Mechanical Design Engineering References
These sources support the design-process, tolerancing, constraint, fatigue, and verification concepts used on this page. Project-specific requirements, company standards, supplier data, governing codes, and current editions still control the actual design.
- ASME — Y14.5-2018 (R2024), Dimensioning and Tolerancing Official ASME source for geometric dimensioning and tolerancing rules, definitions, requirements, defaults, and recommended practices.
- MIT OpenCourseWare — Elements of Mechanical Design Mechanical design course materials covering fatigue, constraints, bearings, bolted joints, shafts, gears, mechanisms, friction elements, and vibration.
- NASA Systems Engineering Handbook — System Design Processes Supports the use of iterative design, validated requirements, interfaces, analytical verification, and design solutions tied to stakeholder expectations.
- NASA Systems Engineering Handbook — Product Realization Provides the distinction between verification of specified requirements and validation that the product functions as intended in its expected environment.
Frequently Asked Questions
What are the basic mechanical design principles?
The basic principles are to define function and requirements first, identify loads and constraints, create a clear load path, check strength and stiffness, account for fatigue and wear, select materials and manufacturing together, control tolerances by function, design for assembly and service, minimize unnecessary complexity, and verify the final design.
What is the first step in mechanical design?
The first step is to define measurable requirements and constraints. Engineers should understand the required function, loads, interfaces, operating environment, life, manufacturing constraints, and acceptance criteria before committing to detailed geometry.
Is CAD the same as mechanical design?
No. CAD represents and documents geometry. Mechanical design also includes requirements, load cases, analysis, material selection, tolerances, manufacturing decisions, assembly strategy, inspection, testing, maintenance, and verification.
Why are tolerances important in mechanical design?
Manufactured parts vary from nominal dimensions. Tolerances define acceptable variation so parts still fit, align, move, seal, preload, and assemble correctly. Unnecessarily tight tolerances increase manufacturing and inspection cost without necessarily improving function.
What should be checked during a mechanical design review?
Review the requirements, load cases, interfaces, constraint strategy, load path, strength, stiffness, fatigue, material, manufacturing method, tolerance stackups, datums, assembly sequence, tool access, inspection method, maintenance needs, and the evidence used to verify critical requirements.
Summary and Next Step
Mechanical design principles connect what a product must do with how it carries load, deforms, wears, fits together, gets manufactured, and survives real service. The strongest designs make their requirements and assumptions visible, concentrate precision where it matters, and verify critical behavior before release.
Use the principles on this page as a review framework rather than a rigid sequence. Different products will emphasize different failure modes, but function, load path, variation, manufacturability, serviceability, verification, and validation remain recurring design questions. For a release-oriented workflow, continue with the mechanical design process.