Key Takeaways
- Definition: Geotechnical risk assessment is the process of identifying ground-related hazards, estimating their likelihood and consequence, and deciding how to reduce uncertainty before it becomes failure, delay, or cost growth.
- Use case: It is most valuable when subsurface conditions are variable, consequences are high, or design and construction choices depend on incomplete information.
- Main decision: The core job is deciding which hazards justify more investigation, design conservatism, monitoring, contingency, or a change in construction approach.
- Outcome: A good assessment turns scattered borings, lab data, groundwater observations, and field judgment into a defensible action plan for safer and more economical projects.
Table of Contents
Introduction
In brief: Geotechnical risk assessment ranks ground hazards by likelihood and consequence so engineers can focus investigation, design, construction controls, and monitoring where uncertainty matters most.
Who it’s for: Students, reviewers, and practicing geotechnical engineers.
For informational purposes only. See Terms and Conditions.
The goal is not to predict the ground perfectly. The goal is to identify which unknowns can actually hurt the project, then manage them before they become claims, failures, or avoidable redesign.
Geotechnical Risk Assessment infographic
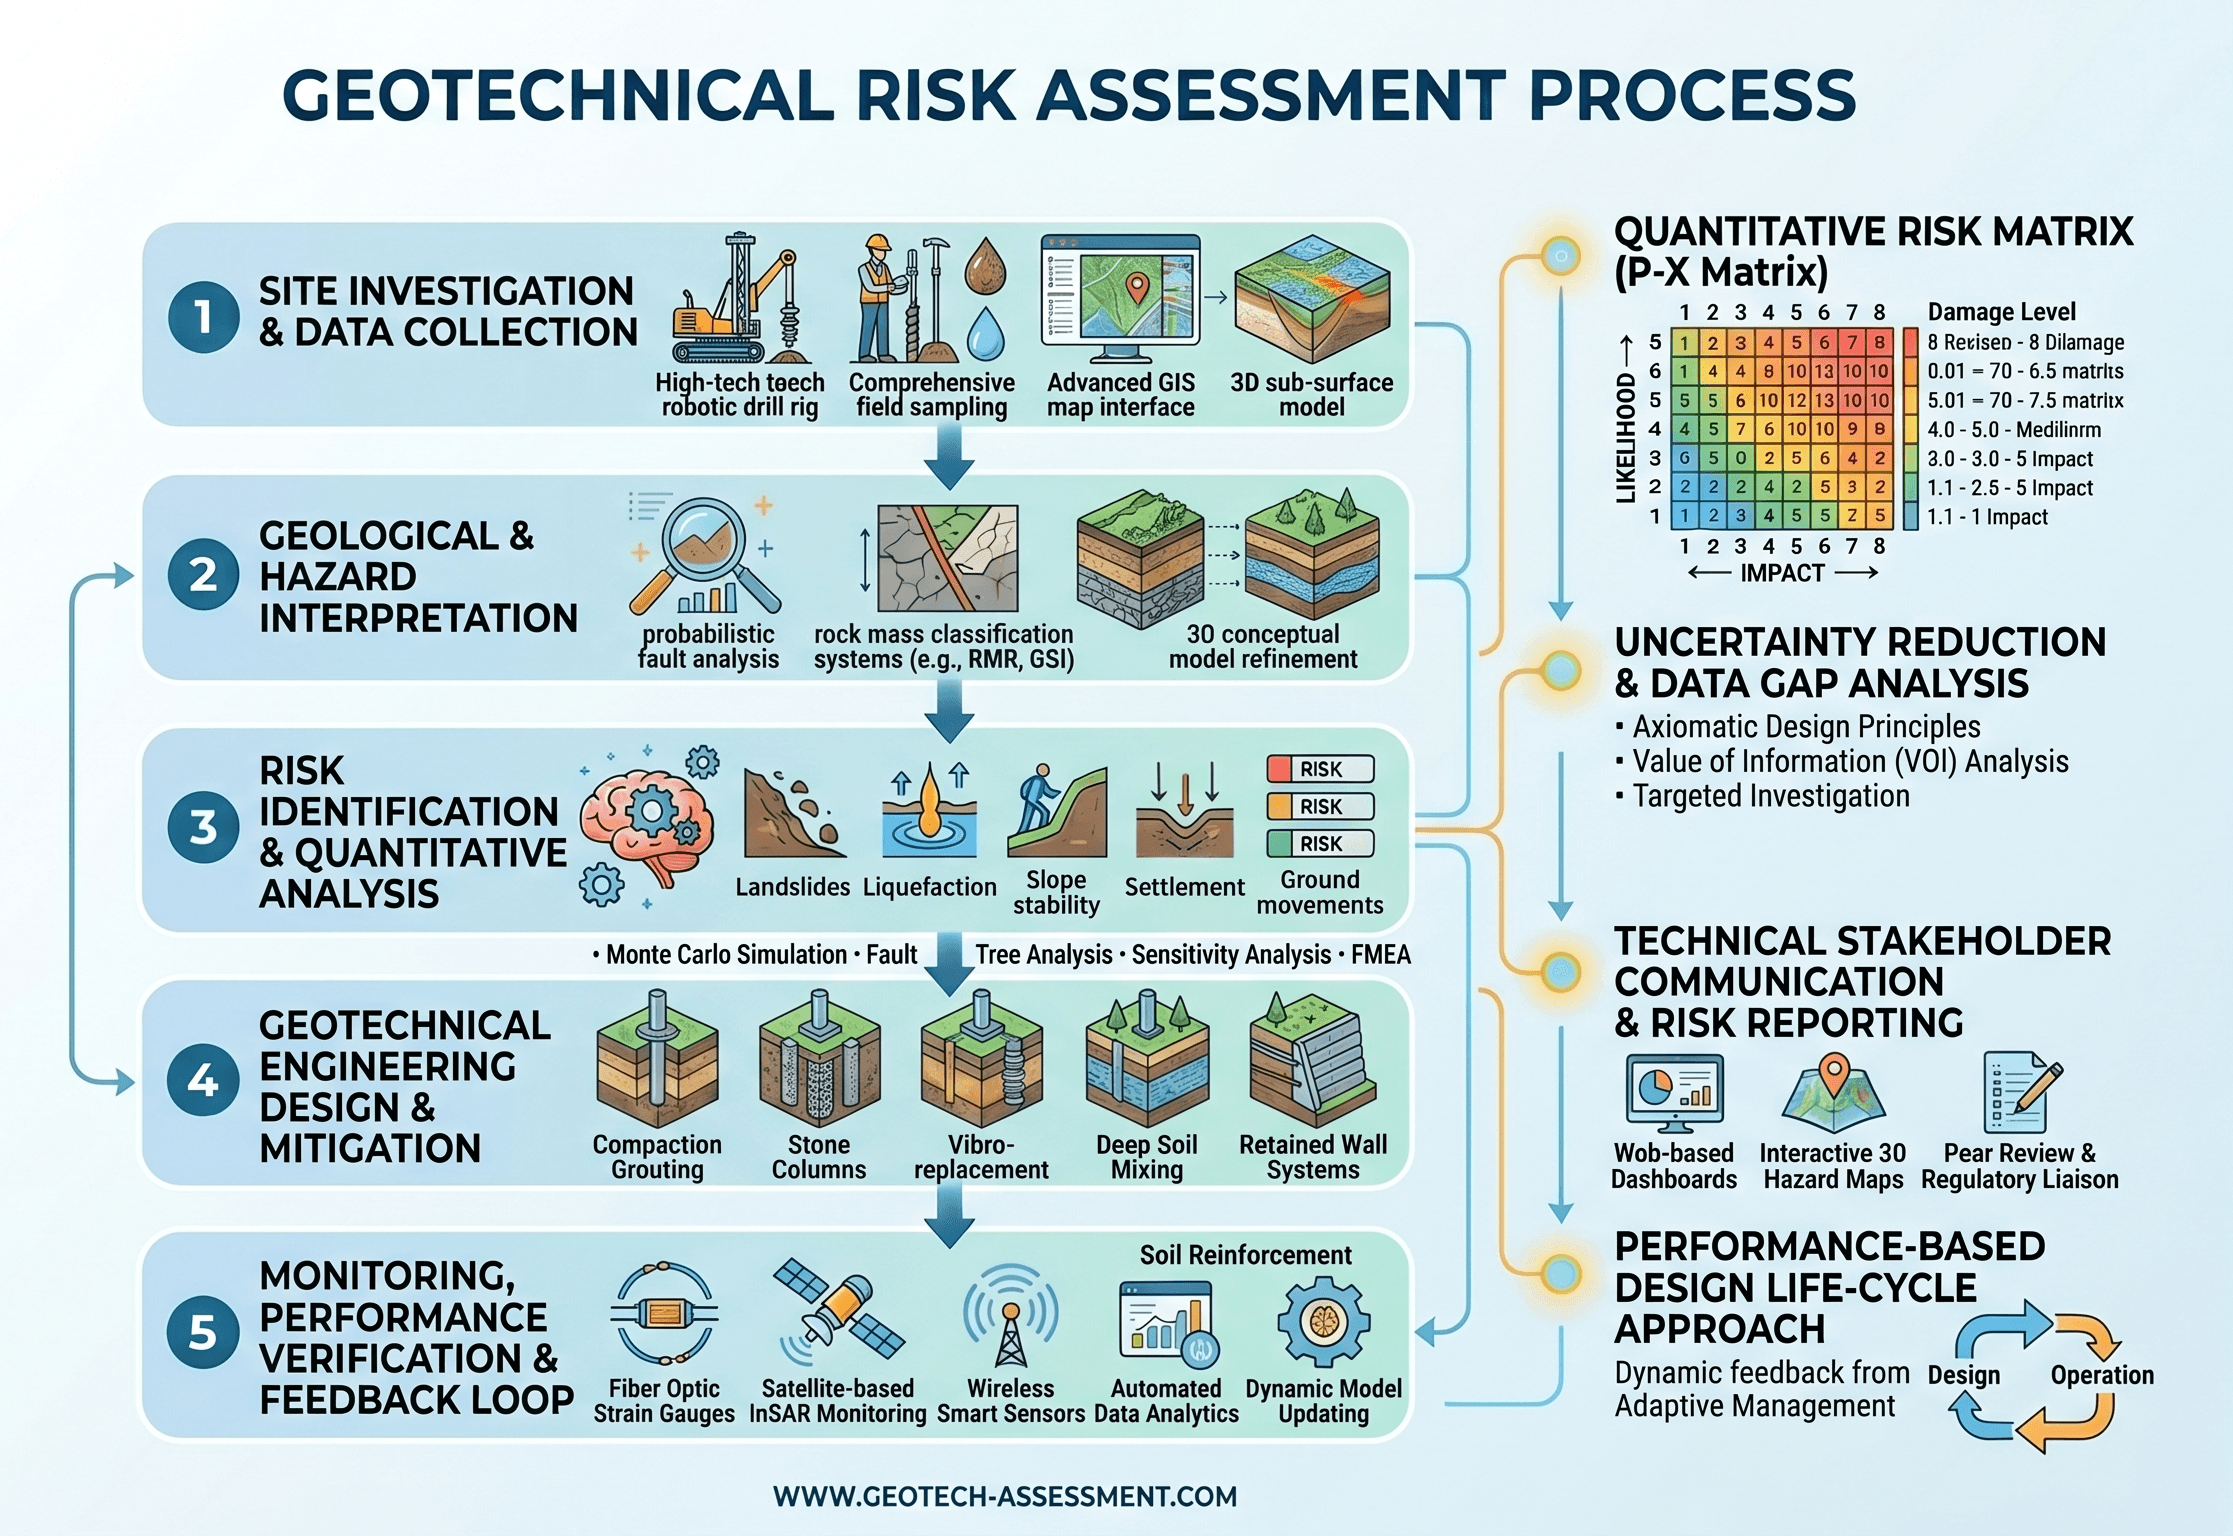
Notice that the diagram is decision-oriented, not data-oriented. A boring log or lab result is only useful if it changes what the project should do next.
What is geotechnical risk assessment?
Geotechnical risk assessment is the structured process of asking four practical questions: what can go wrong in the ground, how likely is it, how bad would it be, and what should the project do about it? In geotechnical work, that usually means screening hazards such as low bearing capacity, excessive settlement, slope instability, soft ground, groundwater inflow, seepage, liquefaction, expansive soils, retaining system movement, or construction difficulties caused by variable stratigraphy.
This matters because geotechnical problems are often not purely calculation errors. They are decision errors made under uncertainty. A project may use correct equations and still run into trouble if the investigation missed a weak layer, groundwater rose seasonally, fill quality was misjudged, or the construction sequence changed the stress path. Risk assessment forces the team to connect limited subsurface information to consequence, not just to parameters.
A useful way to think about it is this: geotechnical investigation tells you what data you have, while geotechnical risk assessment tells you whether that data is enough for the decisions you are making. It sits between site characterization, design, construction planning, and project controls.
The controlling issue is rarely the longest lab report. It is usually the hazard with the largest combination of uncertainty and consequence for safety, constructability, schedule, or lifecycle performance.
Core principles, variables, and units
Most geotechnical risk assessments combine engineering judgment with a simple likelihood–consequence framework. The point is not to create fake precision. The point is to make assumptions visible, rank competing concerns, and justify where more effort is needed.
Key variables and typical ranges
Different organizations use different scales, but most frameworks include a probability or likelihood category, a consequence category, and a resulting risk rating. Some projects also separate uncertainty, detectability, or trigger thresholds for monitoring and response.
- L Likelihood of occurrence; often ranked qualitatively from rare to almost certain, or numerically from 1 to 5.
- C Consequence if the hazard occurs; may reflect safety, cost, schedule, serviceability, environmental impact, or reputation.
- R Risk rating; commonly treated as a relative score such as \( R = L \times C \), used for prioritization rather than exact prediction.
- U Uncertainty or confidence in the model; often not explicit in simple matrices, but critical in geotechnics because sparse data can hide controlling layers or groundwater behavior.
- T Trigger threshold for monitoring or decision-making; for example, lateral movement, piezometric level, settlement rate, or factor of safety threshold requiring action.
Engineers should be careful with units here. The risk categories themselves are often dimensionless, but the parameters that drive them are not. Settlement might be in inches or millimeters, piezometric head in feet or meters, undrained shear strength in kPa or psf, permeability in m/s or cm/s, and groundwater inflow in gpm or L/s. Many geotechnical risk mistakes are still basic unit mistakes disguised as strategy.
Keep the matrix qualitative enough to be honest, but quantitative enough that two reviewers can explain why a hazard was ranked high instead of low.
Decision logic and workflow
A defensible geotechnical risk assessment follows a repeatable workflow. The exact format can vary by owner or project type, but the logic should stay consistent from desktop study through construction.
1) Define the project and consequence categories. 2) List credible ground-related hazards. 3) Review available evidence from site history, geology, borings, CPTs, lab tests, and groundwater data. 4) Rank likelihood and consequence for each hazard. 5) Identify mitigations such as more exploration, design changes, sequencing controls, instrumentation, or contingency plans. 6) Re-rank residual risk after mitigation. 7) Assign owners, triggers, and follow-up actions.
This workflow is most effective when it is hazard-based instead of discipline-based. In other words, do not organize the assessment as “soil,” “water,” and “structure” in separate silos if the real issue is an excavation next to utilities in saturated fill. Organize it around failure mechanisms and project outcomes.
Typical hazard families include:
- Support and deformation issues such as bearing failure, excessive total settlement, or differential settlement.
- Stability problems such as slope failure, basal heave, piping, blowout, sliding, overturning, or global instability.
- Groundwater and seepage issues such as inflow, uplift, erosion, reduced effective stress, and wet-weather constructability problems.
- Material and earthwork issues such as unsuitable fill, collapsible soils, organics, expansive clays, weak subgrade, or poor compaction control.
- Interface risks such as movement of adjacent structures, utilities, pavements, retaining systems, and temporary works.
Equations and calculations
Risk assessment is not one governing equation, but many teams use a simple screening relationship to organize priorities:
Here, \(R\) is a relative risk score, \(L\) is likelihood, and \(C\) is consequence. This is not a substitute for geotechnical analysis. It is a communication tool for deciding where the project needs better information or stronger controls. On a real project, the likelihood score is usually informed by geotechnical calculations and observations rather than chosen in isolation.
For example, a settlement hazard may be judged using estimated settlement magnitude, time rate, and variability:
A slope or excavation hazard may be tied to factor of safety checks, groundwater sensitivity, and construction staging:
The important lesson is that geotechnical calculations feed the assessment, but they do not finish it. A factor of safety of 1.35 may be acceptable in one temporary case and unacceptable in another if consequences are severe, confidence is low, or monitoring is weak. That is why pages like Factor of Safety, Soil Mechanics, and Settlement Analysis often become part of the same workflow.
Worked example
Example: shallow foundation and adjacent retaining excavation
Consider a mid-rise building planned on variable fill over soft clay with an adjacent basement excavation. The preliminary exploration includes a few borings, limited groundwater readings, and index testing. Early review identifies four credible hazards: excessive total settlement beneath spread footings, differential settlement due to variable fill thickness, excavation instability during wet weather, and movement of the nearby sidewalk and utility corridor.
The team assigns relative likelihood and consequence categories. Total settlement is judged moderate likelihood and moderate consequence because the structure can tolerate some movement. Differential settlement is judged moderate-to-high likelihood and high consequence because it can damage the frame and cladding. Excavation instability is judged moderate likelihood but very high consequence because worker safety and adjacent property are involved. Utility movement is judged lower likelihood but high consequence because even limited displacement could trigger service interruption and claims.
Without mitigation, the risk matrix points to two immediate actions: refine the subsurface model near the basement and foundation transitions, and improve groundwater characterization before excavation support is finalized. The project then adds supplemental borings/CPTs, piezometer installations, and staged excavation review points. Design options are also tested: deeper foundations in the softest zone, localized ground improvement, and a stiffer retaining system with monitoring triggers.
After mitigation, the likelihood of missing a weak zone is reduced because the profile is better defined. The excavation hazard remains serious, but residual risk becomes manageable because the project now has a clearer groundwater model, a support system matched to the actual conditions, movement thresholds, and a contingency plan for inflow or softening. This is exactly what a good geotechnical risk assessment should do: not eliminate uncertainty, but reduce it enough that the project can move forward deliberately.
Engineering judgment and field reality
In the field, geotechnical risk is often driven by things that are only partly visible in the office model. Fill is rarely uniform. Groundwater can move seasonally or respond to nearby construction. A clay layer that appears continuous on logs may pinch out between borings. A retaining system that works analytically may still struggle if installation tolerance, weather exposure, or sequencing differs from the assumptions behind the design.
Experienced engineers also know that project risk changes over time. A site may look low-risk during concept design and become high-risk once footprint constraints force a deeper excavation or a tighter setback to an existing structure. Likewise, a hazard with moderate technical severity may become a top project risk if the schedule has no float or if access for remediation is poor.
The most dangerous phrase in geotechnics is often “the borings looked fine.” Risk lives in the gaps between borings, in changing groundwater, and in the assumptions nobody re-checked when the project changed.
Good field judgment means keeping the risk register alive during construction. If exposed conditions differ from the report, or instrumentation trends drift faster than expected, the assessment should be updated instead of treated as a one-time permit document.
Where this method breaks down
A simple geotechnical risk matrix breaks down when it creates the illusion of precision without a credible basis for ranking. This often happens on highly variable sites, in complex urban excavations, on landslide problems with multiple potential failure mechanisms, or on projects where one hazard strongly changes another. A single score can hide important coupling between seepage, effective stress loss, deformation, and construction sequence.
The method also weakens when consequence categories are too generic. “High” consequence means very different things for a rural embankment, a hospital expansion, a deep transit excavation, or a retaining wall beside an operating pipeline. If the categories do not reflect the project, the rankings will not guide useful decisions.
Another breakdown point is failure to separate existing risk from residual risk. A hazard may begin as severe, but the real question is whether planned actions reduce the likelihood, reduce the consequence, or simply document the problem more clearly. If the assessment never distinguishes pre-mitigation from post-mitigation conditions, it becomes a list of concerns instead of a decision tool.
Common pitfalls and engineering checks
- Confusing more data with better decisions. Additional borings only help if they target the uncertainty that controls the project.
- Using a risk matrix as a substitute for mechanics instead of as a framework informed by mechanics.
- Ignoring construction sequence, temporary conditions, and groundwater seasonality.
- Failing to revisit the assessment after scope changes, field changes, or unexpected exposures.
- Ranking hazards without defining what “consequence” actually means for the owner and project team.
One of the costliest mistakes is treating uncertainty as low simply because no failure has been observed yet. Absence of evidence in sparse subsurface data is not evidence of low geotechnical risk.
| Risk driver | Typical indicator | Typical units | Engineering check |
|---|---|---|---|
| Settlement | \(\Delta S\), differential movement, settlement rate | in, mm, mm/month | Check magnitude, rate, variability, and tolerance of the supported system. |
| Instability | Factor of safety, deformation trend, seepage response | dimensionless, in, mm | Review both calculated FS and sensitivity to groundwater, staging, and strength assumptions. |
| Groundwater | Piezometric level, inflow, pressure response | ft, m, gpm, L/s | Check seasonal range, drawdown effects, and whether dewatering changes adjacent behavior. |
| Material variability | Fill thickness, weak layer continuity, index test scatter | ft, m, %, classification | Ask whether investigation spacing is adequate for the decision, not just for the report. |
Visualizing the risk matrix and trigger logic
A useful mental model is a two-step screen. First, use a likelihood–consequence matrix to rank hazards. Second, for the high and moderate risks, create trigger logic tied to actions. For example: if settlement exceeds an alert threshold, increase monitoring frequency; if it exceeds an action threshold, pause the next construction stage and re-check the ground model.
This keeps the assessment practical. High-risk items are not just colored red in a workshop table. They are tied to field measurements, design review points, and named decision-makers.
On real projects, this text-only visualization is often enough: hazard → indicator → threshold → action → owner.
Relevant standards and design references
Geotechnical risk assessment is usually governed more by project delivery standards, owner requirements, and reference manuals than by one single code section. These are some of the most useful references to connect technical risk with design and construction decisions.
- FHWA geotechnical and earth-retaining guidance: Useful for hazard screening, subsurface characterization, earth support, foundation decisions, and risk framing on transportation and infrastructure projects.
- FEMA Building Science guidance: Valuable where flooding, seepage, slope hazards, resilience, and post-event performance affect consequence planning.
- USGS geologic and hazard resources: Helpful for regional landslide, seismic, groundwater, and geomorphic context that should inform early-stage risk screening.
- Project-specific geotechnical baseline reports or owner risk registers: Critical on design-build, tunneling, major excavation, and claims-sensitive work because they define how risk is allocated and documented.
- ASTM and AASHTO test standards: Important because the credibility of the risk assessment depends on the credibility of the data behind it, including classification, strength, compressibility, and compaction testing.
Frequently asked questions
A geotechnical investigation gathers subsurface information through borings, tests, and observations. Geotechnical risk assessment uses that information to judge which hazards matter most, how likely they are, what they could cost, and what actions are needed to reduce uncertainty.
A simple matrix loses value when hazards are highly coupled, consequences are extreme, or uncertainty is so large that category labels hide the real decision. In those cases, staged investigation, scenario analysis, monitoring triggers, or probabilistic evaluation may be more defensible.
It shows up in foundations on variable ground, excavation and retaining work near existing assets, landslide and seepage problems, embankments on soft soils, and any project where groundwater, settlement, instability, or construction uncertainty can alter cost, safety, or schedule.
The controlling risks are usually the hazards with both high uncertainty and high consequence, not necessarily the hazards with the most complicated equations. Ground variability, groundwater behavior, adjacent structures, construction sequence, and limited investigation coverage are common drivers.
Summary and next steps
Geotechnical risk assessment is the bridge between raw subsurface data and real project decisions. It helps teams identify the hazards that matter, judge whether available information is adequate, and match the response to the size of the uncertainty and the consequence of being wrong.
In practice, the best assessments are specific, auditable, and alive. They are specific to the project’s real failure modes, auditable because the rankings are explained rather than asserted, and alive because they are updated when field conditions, design assumptions, or sequencing changes. That is where engineering value shows up.
If you remember one idea, make it this: geotechnical risk is not just about bad soil. It is about the interaction between imperfect knowledge, real consequences, and the choices engineers make before and during construction.
Where to go next
Continue your learning path with these curated next steps.
-
Explore the Geotechnical Engineering hub
Useful for seeing how risk assessment connects to soil behavior, foundations, retaining systems, groundwater, and field investigation topics.
-
Read a deeper dive on Soil Mechanics
Build the foundation for understanding effective stress, seepage, strength, and deformation mechanisms that often drive risk rankings.
-
Study Geotechnical Data Analysis
A practical next step when you need better traceability, cleaner interpretation, and stronger support for likelihood and consequence judgments.